COPY RIGHTS : TO AVOID COPYRIGHT VIOLATIONS, ALL POSTS ARE SHOWN ALONG WITH SOURCES FROM WHERE ITS TAKEN. PLEASE CONTACT ME IN MY EMAIL SALEEMASRAF@GMAIL.COM , IF YOU ARE THE AUTHOR AND YOUR NAME IS NOT DISPLAYED IN THE ARTICLE.THE UNINTENTIONAL LAPSE ON MY PART WILL BE IMMEDIATELY CORRECTED.

I HAVE SHARED ALL MY PRACTICAL WATER TREATMENT EXPERIENCES WITH SOLVED EXAMPLE HERE SO THAT ANYBODY CAN USE IT.

SEARCH THIS BLOG BELOW FOR ENVO ,COMPACT STP,ETP,STP,FMR,MBBR,SAFF,IRON,ARSENIC,FLUORIDE,FILTER,RO,UASB,BIO GAS,AERATION TANK,SETTLING TANK,DOSING,AMC.

SEARCH THIS BLOG

Showing posts with label delhi. Show all posts

Wednesday, March 22, 2017

SOLID WASTE MANAGEMENT IN VARIOUS INDIAN CITIES

 SOLID WASTE MANAGEMENT IN VARIOUS INDIAN CITIES  .TAKEN  FROM  DOWN TO EARTH  MAGAZINE  (CSE)
 You can visit  the original source the read the  full article.

Decentralised treatment options introduced in new rules.

The earlier rules relied on costly centralised facilities for treating and disposing municipal wastes while approximately 50 per cent of it can be easily turned into compost at the local level. Thus, the draft rules have made the much-needed provision for providing incentives to decentralised waste treatment facilities. 

Dear All,

First of all, I would like to ofeer Thanks for incorporating few new aspects like involvement of Informal Sectors (especially the Scrap Dealers) and also emphasising the Decentralised Composting and the Collection of Users' Charge. 
However, I would like to know the scopes for the following too .... 
(a) Adequate provisions with added importance on the Health Concern fo the Waste Pickers / Handlers, be it in case of House to House Collection of Segregated Solid Wastes or the Decentralised Composting or waste trasformation in the Informal Sectors like Scrap Dealers.
(b) Decentralisaion of all others aspects like Source Management, Collection, Segragation, Waste Transformation, M&E etc. apart from that in Composting.
(c) Emphasising the Labour intensive Approach for the decentralised activities, alongwith demotivating the highly mechanised process.
(d) Full stop for the unsustained Waste to Energy Approaches.
(c) Strict efforts for Monitoring and Evaluation

Proper redress for the abovesiad issues may eventually make the whole Solid Waste Management Approach more meaningful and result oriented.
Hoping for the Best and all success for "Near Zero" to "Zero Waste Plan" under each Municipalities.
Thanks and Regards.
Nripendra Kumar Sarma
Guwahati, Assam, India

Decentralised integrated solid waste, waste water and solar energy project at New Motibagh, New Delhi


Waste Water Management: About 70% of the 8 lakh litres of water supplied to the residents, that is, 5.6 lakh litres of waste water generated is treated in a decentralized waste water treatment plant within the campus using the Moving Bed Bio-reactor (MBBR) technology. There is a net savings of Rs.5 lakhs per annum due to direct and indirect savings from a decentralized Waste Water Treatment plant (WWTP) in the campus whose running cost is Rs.55.55 lakhs as opposed to the centralized sewerage system costing Rs.60.62 lakhs.  

The energy savings from 300 solar street lights at the GPRA complex, covering internal roads, common areas, parking lots and bunglows, help in saving Rs.32.28 lakhs per annum. Along with solar water heaters, the savings on electricity is close to Rs.35 lakhs a year.    

Therefore, a decentralised integrated solid waste, waste water and energy project for about 1000 households can achieve clean and green surroundings and financial savings to the tune of Rs.40-50 lakhs per annum

Garbage to gold  at mumbai

Though Gowariker and his colleagues are confident of the technology, they caution that refuse pelletisation is not the only or best way to deal with the growing urban garbage problem. Gowariker points out, "A product mix of compost and fuel pellets may be more appropriate, depending on the financial situation and the demand."

Delhi’s solid waste: a systemic failure

What can Delhi do?
We need hybrid solutions. We need a landfill, but only for rejects and inerts. We need waste to energy, but then such plants should ensure that they run on segregated waste only. With over 50 per cent biodegradable waste, there is high potential to compost or generate biogas out of the segregated wet waste. And all this cannot work, unless we segregate at source. With over thousands of crores being spent on collection and transportation, time has come to think out of the box. We can learn from our neighbours and cities across India that are doing commendable work on waste management.
Look at the Alleypey model, where residents have taken it upon themselves to segregate and treat waste at source. It is the best model in the country on decentralised waste management. We can even look at Panjim; the municipal corporation not only ensures segregation at source, but also segregates dry waste into 30 different categories. And then there is Mysuru, Suryapet, Bobbili and a lot of other cities that are doing commendable work. They have adopted local solutions, not global to become zero-waste cities. The CSE has documented cities that are doing commendable work on waste management.

Government notifies new solid waste management rules


Segregation at source should therefore be at the heart of municipalities’ solid waste management system. The only city that has truly adopted segregation is Panaji. Municipal officials have ensured a citywide system that is designed to collect household waste on different days for different waste streams. This ensures separation. It is combined with penalties for non-segregated waste and has promoted colony-level processing as well. Most importantly, for the bulk of commercial establishments such as hotels it has a bag-marking system so that any non-compliance can be caught and fined.

In Kerala’s Alappuzha segregation happens differently. Here the municipality does not collect waste because it has no place to take it to for disposal. The city’s only landfill has been sealed by villagers who live in its vicinity. This withdrawal of the municipality from waste management has meant that the people have to manage their waste, or be drowned in it. They segregate and compost what they can. The compost is used for growing vegetables and plants in their homesteads. The problem is how to handle all the non-biodegradable waste—paper, plastic, aluminum tins, etc. This is where the government has stepped in. It promotes collection through the already well-organised informal waste-recycling sector. The municipality has ended up saving a huge capital cost it would have otherwise incurred for collection and transportation.


Waste smart cities  http://www.downtoearth.org.in/coverage/waste-smart-cities-54119


Saturday, September 17, 2016

dengue and chikangunya in delhi caripill and eupatorium perfoliatum

NOTE FROM COMPILER:

1.   THE INTENTION OF THIS POST IS TO SHARE INFORMATION FOR THE BENEFIT OF ALL PEOPLE.PLEASE SHARE IT WITH YOUR RELATIVES AND FRIENDS.MAYBE IT WILL HELP SOMEBODY.

2.    ALL THE SOURCES OF INFORMATION ARE INDICATED SO THAT THE READERS CAN GO TO THE ORIGINAL ARTICLE TO READ HIMSELF/HERSELF .

Rule one :Never self medicate.Immediately visit your nearby hospital or Doctor.They will do blood test to confirm dengue and chikangunya or malaria or any other fever thats happening right now in delhi.

Rule Two:: Use paracetamol tablets as given by your doctor to reduce fever of dengue and chikangunya.

Rule three: Never use pain killers.They may cause internal bleeding and kidney problem. Keep watch on urine output.

Rule four:If you have kidney problem, than never use coconut water. It will damage your kidney more.

Rule five: use as much fluid as possible. 

Painkillers turning poison Pills

Probable Indications & Signs of Dengue Infections:
•Live in / Travel to dengue endemic area.
• Feverand 2 of the following criteria:
• Nausea, vomiting
• Rash
• Aches and pains
• Tourniquet test positive
• Leukopenia
• Any warning sign 
(see next list)
Warning signs
• Abdominal pain or tenderness
• Persistent vomiting
• Clinical fluid accumulation
• Mucosal bleed
• Lethargy, restlessness
• Liver enlargement 2 cm
• Laboratory: increase in HCT
 concurrent with rapid decrease
in platelet count
Our local Dengue experts add the following warning signs that are unique to Dengue infections:
  • pain behind the eyes (retro-orbital pain),
  • pain in the bones and joints (hence Dengue’s other name:  “Break-Bone Fever”),  and
  • Mild hemorrhagic manifestations like petechiae (small dots of bleeding under the skin) and mucosal membrane bleeding (e.g. nose and gums) may be seen.
CRITERIA FOR SEVERE DENGUE SYMPTOMS
Severe plasma leakage leading to:
• Shock (DSS)
• Fluid accumulation with respiratory distress
• Severe bleeding as evaluated by clinician
• Severe organ involvement
• Liver: AST or ALT =1000
• CNS: Impaired consciousness
• Heart and other organs
**Several definite indicators of need for immediate hospitalization:
  • black stools (evidence of GI bleeding)
  • coffee-ground vomiting  (congealed blood in vomit)
  • not passing urine for more than 4–6 hours
  • heavy menstruation/vaginal bleeding
  • Frequent vomiting
  • Severe abdominal pain
  • Drowsiness, mental confusion or seizures
  • Pale, cold or clammy hands and feet
  • Difficulty in breathing
https://yucalandia.com/science-health-issues/dengue-what-to-do/

Papaya leaf extract (tablet caripill) raises platelet count but does not cure dengue (the fever and the bone pain).

There is no vaccine or preventive drug except homoeopathic medicines.

And lastly I asked my neighbours to visit a homeopathic doctor near us 

As a preventive: eupatorium perfoliatum 200C , 3 drops ,morning evening for 4 days.Later once a week till the epidemic lasts.

 Method of taking the medicine during fever:
1.Take one cup of water
2. Add three drops of eupatorium perfoliatum 200C .
3.If patient is serious, than give two tea spoonful from the cup after every 10 minutes. If the patient is not serious , than give the medicine after each hour.
200 potency is found to be more effective.

This medicine is highly effective in post fever arthralgia (eupatorium perfoliatum Mother tincture 5 drops tds for 3-5 days). amazingly it decreased the joint pain and swelling

You can take it alongwith your allopathic medicine also. There should be a gap of one hour between allopathic medicine and homeopathic medicine. No side effects. Very cheap.

Consult your locall homeo doctor.THERE ARE VARIOUS OTHER HOMEO MEDICINES.THEY GIVE TWO THREE MEDICINES TOGETHER.

Read more in 
Prophylaxis administered in Sri Lanka is as follows:
01 dose (01 drop or 3 globules) – LED PAL 200 once a week (first day)
03 doses (01 drop or 3 globules) – EUP PERF 30 tid (first day)
01 dose (01 drop or 3 globules) – POLYPORUS PINICOLA/OFFICINALIS 200 once a week (second day)
01 dose (01 drop or 3 globules) – PYROGENIUM 200 once a week (second day)
Source : Dr Usuf Email : drusuf@eureka.lk
REFERENCES:
1. Harrison’s Principles of Internal Medicine.
2. Homoeo Times – International Journal on clinical evidence
3. Vital Informer – Monthly Medical News Letter
4. Homoeopathic Materia Medica and Repertory by W.Boericke.
5 best homeopathic medicines for Dengue followed by a brief description of their symptoms-
  1. Eupatorium Perfoliatum
  2. Bryonia
  3. Phosphorus
  4. Rhus Tox
  5. Carica Papaya

1. Eupatorium Perfoliatum 200 for dengue fever with bone breaking pains 

It is the most suitable remedy for the treatment of Dengue fever as the symptoms of this medicine almost completely mimic that of Dengue fever.  It is precisely for this reason that this medicine is called ‘Bone Set’, as it is able to relieve the terrible bone pains that accompany the Dengue fever.  It has the same sort of deep bone pains that are almost excruciating in nature. The pain is present in the limbs and the muscles and accompanies a fever which is usually high. There is usually throbbing type of pain in the head. Pain may be felt in the occipital or the back part of the head and also on the top of the head. There is soreness in the eyes or the eyeballs.

2. Bryonia – Homeopathic remedy for dengue fever with intense thirst,joint pains worsen with motion

This medicine also has pains in the whole of the body and the upper as well as the lower limbs along with high grade fever.  The pains are usually stitching and tearing sort of pains. The two distinguishing features of this medicine are increased thirst and that the pains and all sorts of sufferings of the patient are aggravated by motion. In fact, motion of any and every sort tends to aggravate the pains in the body and the limbs. Whenever the patient tries to walk or move or even turn in bed, the pains and the suffering become intolerable. He feels better while at rest and does not want to move. There is so much dryness of the mouth, tongue and other mucous membranes that patient wants to drink a lot of water and ends up drinking a lot at one go. The taste of the mouth is bitter.

3. Phosphorus – Homeopathic medicine for haemorrhagic dengue fever

It is one of the best homeopathic remedies for the haemorrhagic dengue fever. There is burning and numbness of the hands, arms and feet. Intense thirst accompanies the fever, so much so that the patient wants to have cold water or even chilled water. Hemorrhage from any and every part or orifice of the body may be seen. The patient may feel unusually hungry.

4. Rhus Tox 200 – Homeopathic remedy for pains relieved by motion,joint pains get better by motion

It is indicated by the muscular soreness and pains in the body which are relieved only while in motion. The patient cannot rest as it is the worst position for him. The tongue gets coated white while the tip of the tongue remains red and forms a red triangle at the tip.

5. Carica Papaya- Homeopathic remedy for improving platelet count

Carica Papaya is a homeopathic remedy made from papaya fruit. It is a common fruit and its seeds are used to make a homeopathic remedy. It has been seen that it improves the platelet counts in patients whose platelets are falling.

The most specific feature to choose Bryonia Alba is worsening of pains by any movement even in the least degree. This Homeopathic medicine is the best remedy when rest is the main position for relief from pain. Extreme thirst with a dry mouth may be felt along with this specific feature. Rhus Tox is the ideal Homeopathic medicine when a patient experiences relief from pain by movement and worsening of pain by taking rest.
Internet:
1. www.wikipedia.org/wiki/Chikungunya
2. www.cbwinfo.com/Biological/Pathogens/CHIK.html
3. www.phacaspc.gc.ca/msdsftss/msds172e.html
4. www.hpathy.com
5. www.chikungunya.co.uk


Disclaimer: This information is not meant as medical advice. It is for  informational purposes only.

Sunday, July 10, 2016

Delhi sight seeing My Pick of sights to see in Delhi


If you want a vacation, go to Belize. If you want to be transformed, go to Delhi. You don’t visit Delhi — you experience it.

Health: Delhi-belly is practically unavoidable. But you can reduce your chances of feeling unwell by drinking only bottled water, eating freshly cooked food, avoiding raw foods like salads (which may have been washed in unclean water), foregoing ice cubes and using hand sanitizer. Wear loose fitting cotton clothes.Use Fully AC Metro or AC cars. 


My Pick of sights to see in Delhi

Delhi is way too big to tackle all at once. Each day, pick an area, such as Old, New or South Delhi, and go exploring. Delhi needs at least three full days.

Old Delhi

  • Red Fort
  • Markets of Chandni Chowk
  • Jama Masjid 

New Delhi

  • India Gate
  • Rastrapati Bhawan
  • Palika bazaar,Connaught Place
  • Janpath market,Connaught Place
  • Dargah Nizamudddin and karims restaurant
  • Humayun’s Tomb

South Delhi

  • Lotus Temple
  • Qutab Minar
  • Rail Museum
  • Lajpat nagar Central market
  • Dilli Haat
  • Sarojini Nagar Market
  • Food shops at Zakir Nagar specially javeds naharee and taalibs kebaab
http://www.weareholidays.com/articles/25-places-to-visit-in-delhi/

Thursday, December 24, 2015

How to make your own HOME BIO GAS PLANT FROM KITCHEN WASTE

KITCHEN (FOOD) WASTE---SMALL MODULAR BIO GAS SYSTEM FOR INDIVIDUAL HOUSES

How much Kitchen Waste do we have to feed on daily basis?

Kitchen waste is high calorie feedstock which contains starch, sugar, cellulose or protein. This material is capable of producing more quantity of methane per ton of feedstock (on dry weight basis). Care must be taken to ensure that kitchen waste like vegetable pcs, leaves, wheat roti / bread or solid left overs are converted in semi liquid form before feeding in the Plant. This can be done either by using food crusher or keeping kitchen waste in Bucket with water for 4 to 5 hours prior to feeding.
  DATA CHART :
Gas Generation Capacity
SIZE OF TANKS (PVC)
Mix Kitchen Waste / day
Water / day
Initial Cow Dung charging
DIA
HEIGHT
0.5 Cu. Mtr
1600
1100
2.5 Kg
2.5 Litrs of Water
20 Kg
1.0 Cu. Mtr
2100
1500
5 Kg
5 Litrs of Water
25 Kg
1.5 Cu. Mtr
2300
1650
10 Kg
10 Litrs of Water
30 Kg
2.0 Cu. Mtr.
2550
1800
20 Kg
20 Litrs of Water
35 Kg

Gas Volume :
One Cu. Mtr. Bio Gas runs approximately 1 Hour at a time. One can cook three meals per day by using 1 cum Bio Gas Plant.
We can use Bio Gas frequently about three times a day with the interval of around 2 to 3 hours.1 cum of bio gas is equal to 0.43 kg of LPG. About 5 kg. of kitchen waste is required for 1 cum. plant. Gas coming out of the plant can be used in the kitchen with the help of biogas stove while the slurry coming out from the outlet can be used as manure. The gas generated will have 60 to 70% methane, 5 to 10% water vapour (moisture) and the balance will be Carbon-di-oxide.

How it works :

The main digester is initially fed with fresh cow dung slurry so that slurry comes out from the slurry outlet pipe. The ratio of dung and water should be 1:1 Subsequently, cattle dung is not needed. Now wait for bio gas production to start in the newly installed plant. It may take 2-3 days for the first production of gas.
As gas starts producing, one can start feeding the plant daily with  kitchen / vegetable waste in a small quantity and increase it to the recommended quantity after one week.. The ratio of kitchen waste and water should be 1:1.This will facilitate easy flow of waste through inlet  into  the  bio-methanization  plant.  The  value  of    pH  of  the  kitchen  waste  should  be ideally kept  at 7 for optimum production of biogas. Make a slurry of lime by adding one kg lime with 10 liter of water and add it into the digester chamber to make pH 7. Check with pH paper whether the pH is 7 or not regularly.
LOCATION:  Always in a sunny area where temperature is high and as near to kitchen as possible so that gas pipe length is less.

OPERATING COST : The operating cost of Bio Gas plant is very less.  All what required for 1 Cu. Mtr Bio Gas plant is  5 to 6 Kg of Kitchen waste / on dry weight basis. Break even period is approximately 5 to 6 years if Gas is used for cooking application                                  

CONTACT US ENVO PROJECTS Mobile: 09899300371

Mini Bio-gas plant using food waste, decomposable organic material and kitchen waste

Source Of The Article: http://www.instructables.com/id/Bio-gas-plant-using-kitchen-waste/
Components of the Bio-gas Plant

The major components of the bio-gas plant are a digester tank, an inlet for feeding the kitchen waste, gas holder tank, an outlet for the digested slurry and the gas delivery system for taking out and utilizing the produced gas.

This project is also useful for students to have a hands-on learning experience in constructing a Mini Bio-Gas Plant, using locally available material.

Material Required:

1. Empty PVC can 50 ltrs capacity: 1 No. (to be used as Digester Tank)
2. Empty PVC can 40 ltrs capacity: 1 no. (to be used as Gas Holder Tank) (Make sure the smaller can fits inside larger one and moves freely)
3. 64 mm dia pvc pipe: about 40 cm long (to be used for feeding waste material)
4. 32 mm dia pvc pipe: about 50 cm long (fixed inside gas holder tank as a guide pipe)
5. 25 mm dia pvc pipe: about 75 cm long (fixed inside the digester tank as a guide pipe)
6. 32 mm dia pvc pipe: about 25 cm long (fixed on digester tank to act as outlet for digested slurry)
7. M-seal or any water-proof adeshive
8. Gas outlet system: Please see Step 4 below for required materials and construction

Tools required

Do not require many tools here. A hack saw blade for cutting the cans & pipes and a sharp knife for cutting holes on the cans are all the tools we need.

Additional accessories

A single burner bio-gas stove or a Bunsen Burner used in school laboratories
Initially, cow-dung mixed with water will be fed in to the system, which will start the gas formation process. Subsequently, food waste, decomposable organic material and kitchen waste will be diluted with water and used to feed the system. The gas holder will rise along the guide pipes based on the amount of gas produced. We can add some weight on top of the gas holder to increase the gas pressure. When we feed the system, the excess digested slurry will fall out through the outlet pipe, which can be collected, diluted and used as organic manure.

Initial production of gas will consist of oxygen, methane, carbon di oxide and some other gases and will not burn. These gases can be released to the atmosphere by opening the ball valve at least three / four times.

Subsequent gas will consist of about 70 to 80 percent methane and the rest carbon di oxide, which can be used in a single bio-gas burning stove or a Bunsen burner.

Total cost of this proto-type system is about one thousand Indian Rupees (about 20 dollars)
Gas formation started and the gas holder tank gets lifted up. I have placed two bricks on top of the gas holder to get more gas pressure.

Note for students who are doing this as their School Project:

1. Take guidance from your teacher while using the gas in a stove or Bunsen burner.
2. Collect surplus food and wastage during lunch, dilute and feed the system.
3. Fruit peels, extracted tea powder, waste milk and milk products  can also be used for feeding the system.
4. DO NOT USE eggshells, Onion peels or left-over bones in this system as they will affect the efficient functioning of the system
5. Plant some seedling
6. while feeding, collect the slurry from the outlet, feed the seedlings and watch them grow

Read step by step instruction at: http://www.instructables.com/id/Bio-gas-plant-using-kitchen-waste/


Components of the Bio-gas Plant

The major components of the bio-gas plant are a digester tank, an inlet for feeding the kitchen waste, gas holder tank, an outlet for the digested slurry and the gas delivery system for taking out and utilizing the produced gas.


This project is also useful for students to have a hands-on learning experience in constructing a Mini Bio-Gas Plant, using locally available material.


Material Required:


1. Empty PVC can 50 ltrs capacity: 1 No. (to be used as Digester Tank)

2. Empty PVC can 40 ltrs capacity: 1 no. (to be used as Gas Holder Tank) (Make sure the smaller can fits inside larger one and moves freely)
3. 64 mm dia pvc pipe: about 40 cm long (to be used for feeding waste material)
4. 32 mm dia pvc pipe: about 50 cm long (fixed inside gas holder tank as a guide pipe)
5. 25 mm dia pvc pipe: about 75 cm long (fixed inside the digester tank as a guide pipe)
6. 32 mm dia pvc pipe: about 25 cm long (fixed on digester tank to act as outlet for digested slurry)
7. M-seal or any water-proof adeshive
8. Gas outlet system: Please see Step 4 below for required materials and construction

Tools required


Do not require many tools here. A hack saw blade for cutting the cans & pipes and a sharp knife for cutting holes on the cans are all the tools we need.


Additional accessories


A single burner bio-gas stove or a Bunsen Burner used in school laboratories

Initially, cow-dung mixed with water will be fed in to the system, which will start the gas formation process. Subsequently, food waste, decomposable organic material and kitchen waste will be diluted with water and used to feed the system. The gas holder will rise along the guide pipes based on the amount of gas produced. We can add some weight on top of the gas holder to increase the gas pressure. When we feed the system, the excess digested slurry will fall out through the outlet pipe, which can be collected, diluted and used as organic manure.

Initial production of gas will consist of oxygen, methane, carbon di oxide and some other gases and will not burn. These gases can be released to the atmosphere by opening the ball valve at least three / four times.


Subsequent gas will consist of about 70 to 80 percent methane and the rest carbon di oxide, which can be used in a single bio-gas burning stove or a Bunsen burner.


Total cost of this proto-type system is about one thousand Indian Rupees (about 20 dollars)

Gas formation started and the gas holder tank gets lifted up. I have placed two bricks on top of the gas holder to get more gas pressure.

Note for students who are doing this as their School Project:


1. Take guidance from your teacher while using the gas in a stove or Bunsen burner.

2. Collect surplus food and wastage during lunch, dilute and feed the system.
3. Fruit peels, extracted tea powder, waste milk and milk products  can also be used for feeding the system.
4. DO NOT USE eggshells, Onion peels or left-over bones in this system as they will affect the efficient functioning of the system
5. Plant some seedling
6. while feeding, collect the slurry from the outlet, feed the seedlings and watch them grow 

Step one; 50 ltrs capacity PVC can, which will act as the digester unit and removed the top portion of the can, by cutting it with a hack saw blade: 

Step 2: The smaller white can, which will act as the gas holder fits inside the red one. Here, again removed the top of the white can, also with the help of a hack saw blade:


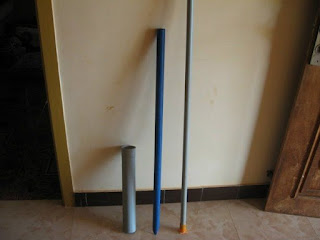
Step 3: 64 mm, 32 mm and 25 mm dia PVC pipes which  will be used for feeding the kitchen waste, guide pipe for the gas holder and guide pipe fixed with the digestion chamber respectively. A small piece of 32 mm dia pipe will be used as outlet for the slurry:

Step 4:

1.  items required for the gas delivery system: got these items from a hardware store


1. Ball valve : one no ( to adjust the gas flow)
2. 'T' joint : one no ( to connect the gas holder and the ball valve)
3. Cap to block one end of 'T' joint : one no
4. Coupling or Adapter : one no (to connect vertical end of 'T' in to the gas collector)
5. Nipple: one no (added to the coupling in to the gas collector)
6. Gas pipe (flexible) : two meters
7. Barb : one no (fitted with the gas pipe, to join with the Ball valve)
8. Clip : one no (used for crimping the barb with the gas pipe and make it leak-proof)
9. Teflon tape : one roll (used as thread tape in all joints)

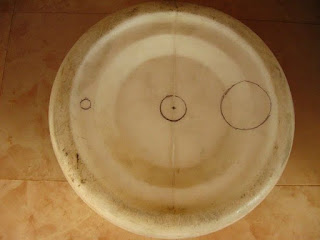
Step 5: Here I have marked the cuts to be made in the bottom of the gas collection tank. The smaller hole on the left for gas delivery system, center hole for fixing the 32 mm guide pipe and 64 mm hole for fixing the waste feeding pipe on the right side. Made these holes with the help of a sharp knife and hack saw blade.


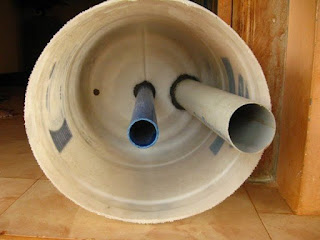
The next image is Inside of the gas holder showing the 32 mm guide pipe (center) and the 64 mm feeding pipe fixed with M-seal

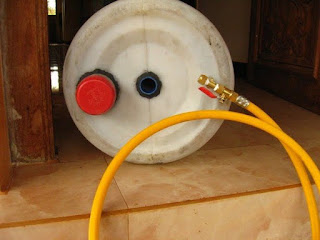
 Step 6: Top view of the gas holder showing the feeding pipe, central guide pipe and the gas delivery system: I have closed the feeding pipe withe an old lid  (red one). This will facilitate opening the feed pipe only during feeding the system.

Step 7: Digestion tank fitted with the central guide pipe and the outlet pipe for the slurry:

Step 8:

Completed unit. I have removed the gas pipe, so that the joints will get cured without any stress:
Step 9:

Charged the digester tank with cow dung diluted with water. Placed the gas holder tank and left it for two three days. The cow dung slurry started the process of gas forming.

Gas formation started and the gas holder tank gets lifted up. I have placed two bricks on top of the gas holder to get more gas pressure.
Step 10:
Note for students who are doing this as their School Project:

1. Take guidance from your teacher while using the gas in a stove or Bunsen burner.
2. Collect surplus food and wastage during lunch, dilute and feed the system.
3. Fruit peels, extracted tea powder, waste milk and milk products  can also be used for feeding the system.
4. DO NOT USE eggshells, Onion peels or left-over bones in this system as they will affect the efficient functioning of the system
5. Plant some seedling
6. while feeding, collect the slurry from the outlet, feed the seedlings and watch them grow

Wait for a day or two before feeding the system, allowing all joints to get cured and become leak-proof.

Initially, cow-dung mixed with water will be fed in to the system, which will start the gas formation process. Subsequently, food waste, decomposable organic material and kitchen waste will be diluted with water and used to feed the system. The gas holder will rise along the guide pipes based on the amount of gas produced. We can add some weight on top of the gas holder to increase the gas pressure. When we feed the system, the excess digested slurry will fall out through the outlet pipe, which can be collected, diluted and used as organic manure.

Initial production of gas will consist of oxygen, methane, carbon di oxide and some other gases and will not burn. These gases can be released to the atmosphere by opening the ball valve at least three / four times.

Subsequent gas will consist of about 70 to 80 percent methane and the rest carbon di oxide, which can be used in a single bio-gas burning stove or a Bunsen burner.

Total cost of this proto-type system is about one thousand Indian Rupees (about 20 dollars)

This is a basic prototype of a Bio-gas system using the food waste, decomposable organic material and kitchen waste to produce gas. An one thousand liter capacity Digestion tank will be sufficient for a small household for daily cooking purpose. The bigger commercial models provide a water seal between the digestion tank and gas holder tank.


You can get further information on kitchen waste based mini Bio-gas plant at the following links


http://www.instructables.com/id/Constructing-a-Medium-Sized-Biogas-Plant-Using-Kit/step3/Other-Materials-Required/